How do I zoom and rotate in Makeup Mania makeup?
Arrows at the bottom rotate the face. Zoom moves in and out, and you can move the face up and down. Set skin color and eye color from Skin before you rely on a tight zoom.

Makeup Mania makeup is a 2D vanity on Place 117935850321807 by Make-up Mania!. Arrows at the bottom rotate the face. Zoom moves you in, out, up, and down. Skin sets skin color and eye color. The right-hand strip sets color, brush size, and strength before each stroke. Checked October 6, 2026. Play on Roblox.
Paint foundation with match skin, blend, powder, brows with mirror on, contour, shadow, blush, liner, then lips. Filling liner with mirror off can throw stray lines across finished paint. Lashes are not a brush. Shape stencils are an Unverified gamepass, not the free tray. Group 409491256 is updates, not a palette.
| Fact | Detail |
|---|---|
| Place | 117935850321807 |
| Canvas | 2D vanity: skin through lips |
| Rotate | Arrows at the bottom turn the face |
| Zoom | In, out, and move up or down |
| Skin | Skin color and eye color |
| Right strip | Color, brush size, strength (opacity) |
| Match skin | Foundation shade; concealer uses it, then goes slightly lighter |
| Mirror | On copies a brow and the lip liner. Off only to fill liner |
| Liner fill | Mirror off can glitch stray lines onto the makeup |
| Not on this tray | 3D lashes — Catalog face accessories |
| Stencils | Stars, hearts, and similar stamps — Unverified gamepass |
| Checked | October 6, 2026 |
Matched by build plan, shared topics, and guide progression — not random related links.
Set the view before the first color. Bottom arrows rotate the face. Zoom goes in and out, and the face can move up and down so the eye or the mouth fills the working area. Skin, on that same opening beat, changes skin color and eye color.

| Control | Use it for | Skip it when |
|---|---|---|
| Bottom arrows | Turn the face to a side for contour and liner | You are still picking a skin tone |
| Zoom | Edge of a brow, a wing, a lip line | Foundation. A tight zoom makes the cover pass slow |
| Move up / down | Park the eye or the mouth in the middle | The feature you need is already centered |
| Skin color | A tone you can paint on | You are using it as eyeshadow |
| Eye color | A theme that needs a different iris | Round one, if the banner does not mention the eyes |
| Catalog | Hair and lashes after the lips | You have not finished the base |
Click skin and set a color you can draw on. A strong pink and a tone that reads too yellow are both easy to overshoot; brightness can come down, and quick shades can be applied as a start. Those swatches are a starting point. Goth, Fairycore, or a pale banner still begins with skin, then pushes color in shadow and lips. Live theme names are whatever the HUD prints — maps are on themes.
Apply, then zoom in. Brow edges and liner are miserable at full-head distance. Eye color can wait until the paint is blocked in if the banner does not call for it.
Contour wants a side angle so the cheek sits where you think it sits. Liner wants that same turn so the outer corner is visible. Paint the stroke, then rotate back to the front and check both sides. A wing that looks sharp only from the left is unfinished. The brush settings for those strokes are the next section.
The right-hand strip is color, size, and strength. Strength is opacity. Set both before the stroke. Scrubbing harder does not replace a brush that is the wrong size.
| Job | Size | Strength | Color note |
|---|---|---|---|
| Foundation | Large, enough to cover the face | Up, all the way in the sessions that finish the coat | Match skin |
| Concealer | Much smaller | High enough to show, still local | Match skin tone, then slightly lighter |
| Blend | Fit the patch you are softening | Up | No new hue. You are mixing what is already there |
| Powder | A pass over shiny zones | Light | Scroll down the tool list. The job is shine, not a new skin |
| Brow body | Near 21 in one session, then a bit lower for the edge | Normal | 21 is that session’s slider, not a required default |
| Brow strands | All the way down | Down a little, then up a little if the lines vanish | Slightly darker and slightly lighter than the base |
| Shadow | Up a little from the strand size | Enough to see the arc | Outskirts of the eye |
| Liner | Not large | Opaque | Usually black on a first round |
| Lip center | Fit the mouth | Low | Lighter than the lip liner, middle and edge |
Foundation uses match skin so the coat is the shade you already chose, not a second face. Cover with a large brush and strength up. A tiny brush here spends the round dabbing skin one spot at a time. Concealer is the opposite: smaller brush, match skin tone, then a step lighter than that match. The lighter step is the concealer read. If you skip match and pick a random peach, the patch becomes a new skin tone through the theme.
After concealer, blend. Strength stays up and size follows the patch: smaller at the eye, larger on a cheek. Blend does not invent color. If the edge is still a stamp, you are on the wrong size, not the wrong theme. Powder comes next, further down the list, to knock shine off the forehead and nose. Stop when the highlight dulls. A heavy powder pass that erases foundation is a repaint.
A cheek-sized brush ruins a lash line. A strand-sized brush never finishes foundation. One session starts the brow pencil near 21, drops it to trace the outskirts, then puts size all the way down for dark lines. If your slider shows a different range, match the idea: medium for the body, small for the edge, smallest for hairs. Undo is cheaper than painting the opposite color over a wide miss. The brow that uses this strip is next.
Turn mirror on before the brow. One side copies to the other, so you paint a single brow. Pick the base color and the lighter and darker colors you will actually use before you start the strands.
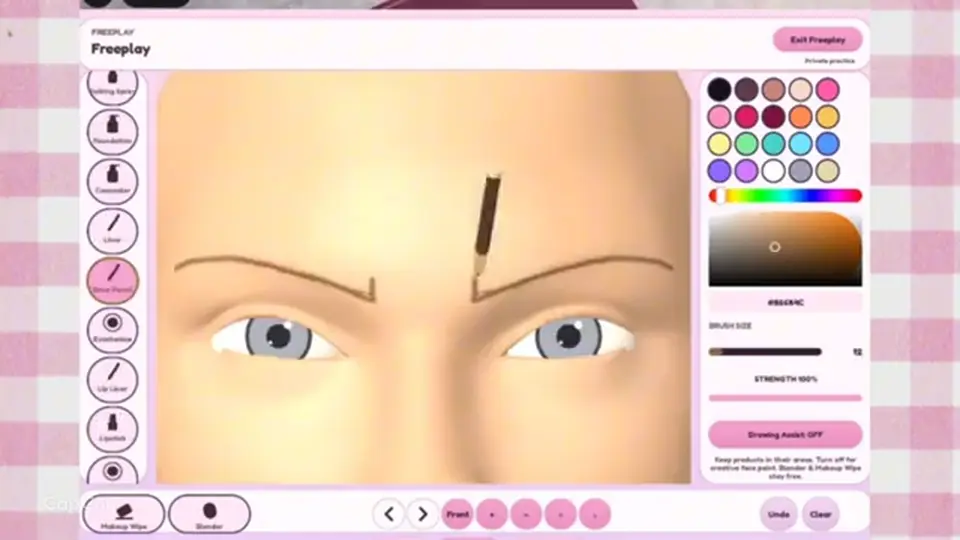
| Pass | Mirror | What “done” looks like |
|---|---|---|
| Base | On | A pair, not two unrelated shapes |
| Edge | On, brush a step smaller | A sharper outline. Zoom in if it wobbles |
| Strands | On, smallest brush | Darker and lighter lines through the body |
| Carve | On, concealer near the skin | A neater edge. The first shape can be rough because the carve cleans it |
| Portrait finish | Off this clock | A rough pair still beats an empty brow |
With mirror on, the stroke lands on both sides. That is why you do not draw the second brow by hand. If the copy looks wrong, fix the side you are drawing. Drawing the other side “to correct it” with mirror still on doubles the error. Custom brow color can sit in an orange-brown rather than pure black for the base; black is easier to save for liner.
Shrink the brush. Add strands with a slightly darker color and a slightly lighter color until the body has texture. Then take concealer close to the skin tone and carve the outline so the shape looks neater. The carve is why a messy first body is allowed. Do not restart the brow because the block-in was ugly. Carve, look, stop.
Size all the way down and strength a little down keeps those strands from blobbing. If they disappear, raise strength a little and add lines, the same recovery used on the beginner guide. Chasing a portrait here is how shadow never gets painted. Contour and the eye are next.
These layers decide whether the theme reads. Do them after powder and brows, in this order, so a later stroke does not bury an earlier one. Lashes still wait until you leave the tray.
| Layer | View and mirror | Target |
|---|---|---|
| Contour | Face turned to the side. Color similar to the skin tone | A shadow in the right spot, not a new stripe of brown |
| Eyeshadow | Brush a little larger than the strand size | Depth on the outskirts of the eye |
| Blush | Cheeks. A brighter shade than the first muddy swatch | A small zone. Then a nose contour, then blend |
| Liner shape | Side angle, brush kept small, usually black | A wing you can see without zoom |
| Liner fill | Mirror off | Fill the shape. Undo if stray lines appear |
| Lip liner | Mirror back on, darker color | An outline, then the whole lip filled with that darker color |
| Lip depth | Low strength, lighter colors | Middle and the edge, so the mouth is not one flat stamp |
Turn the face before contour and use a color close to the skin tone. A contour that only looks placed from the front is usually on the wrong plane. Eyeshadow then adds depth around the outskirts of the eye. If the arc climbs into the brow you just carved, undo and take a shorter pass. One readable socket color beats three muddy layers.
Blush goes on the cheeks. Drop the first dull swatch if it fights the banner and pick a brighter one. Contour the nose after the cheek, then blend the edges. Blush that reaches the nose as a smear reads as a stain. Blend strength up, size matched to the patch, same as the concealer blend.
Draw the liner shape with the brush kept small. A fat brush turns the wing into a bar. When the shape exists, turn mirror off to fill it in. That fill is the step that glitches: random lines can land on top of shadow, blush, and the brow. If a line appears where you did not draw, undo immediately and fill again in shorter strokes. Do not “cover” the glitch with more shadow. You will bury the socket.
Turn mirror back on before lip liner. Leaving it off makes one lip an accident.
With mirror on, take a darker color and color the entire lip, not only a thin ring. Then drop strength and lay lighter colors through the middle and around the edge. That low-strength pass is depth. Strength left high replaces the mouth and you lose the edge you just drew. A clear shape matters more than the exact hex.
Shape stamps — stars, hearts, and similar — are tied to Shape Stencils, an Unverified pass, not this free brush. Prices sit on gamepasses. When the lips are blocked in, leave the canvas: lashes on lashes, then one hair try-on on hair.
Most failed canvases are a control left on the previous tool. Scan this before you open Catalog.
| What you see | Fix |
|---|---|
| Foundation in dots | Larger brush, strength up, match skin |
| Concealer is a second skin tone | Match skin tone, then only a step lighter, smaller brush |
| Hard edges after concealer | Blend with strength up. Change size to the patch |
| Shiny forehead under brighter light | Powder. Stop when the shine dulls |
| Two different brows | Mirror on. Paint one side |
| Strands are blobs | Size all the way down, strength down a little |
| Strands invisible | Strength up a little, add lines |
| Random lines across the eye makeup | Mirror was off for the liner fill and glitched. Undo. Fill in short strokes |
| Lip is a flat stamp | Darker full lip first, then lighter colors at low strength in the middle and on the edge |
| Looking for lashes in the tray | Catalog face accessories — lashes |
| Stars and hearts missing from the free brush | Those stamps are an Unverified stencil pass, not a hidden slider |
| Advice from Makeup Mania 3D | Ignore it. This BETA is Place 117935850321807 |
Change size or strength or mirror, make one stroke, and look at a normal view. Players who move all three and keep drawing cannot tell which change caused the stray line. Undo beats a cover-up. When base, brows, socket, liner, and lips are readable, stop. Extra texture “until it looks professional” is how the vote starts without a lash or a hair style.
The round order around this canvas — theme, then this paint, then lashes, one hair, vote — is the beginner guide. A 300-second design clock is Unverified. Use the order either way.
Lashes leave this tray: lashes. One hair style after the lips: hair.
Theme colors: themes. First-round order: beginner guide. Vote camera: runway.
Arrows at the bottom rotate the face. Zoom moves in and out, and you can move the face up and down. Set skin color and eye color from Skin before you rely on a tight zoom.
On the right-hand strip with the color: size and strength. Strength is the opacity control. Set them when you change tools. Foundation wants a large brush and strength up. Liner and brow strands want a small brush.
On for brows and for lip liner, so one side copies across. Off only when you fill a liner shape you already drew. That fill can glitch random lines onto the makeup. Undo if it does, then turn mirror on again for the lips.
No. The tray is skin, foundation, concealer, blend, powder, brows, contour, shadow, blush, liner, and lips. 3D lashes are face accessories. Steps are on lashes.
Fill the lip with a darker color first, mirror on. Then lower strength and add lighter color in the middle and around the edge. High strength on that second pass replaces the shape.
The size, strength, mirror, and color strip are the free canvas. Shape stamps such as stars and hearts are tied to Shape Stencils, an Unverified pass on gamepasses.
Matched by build plan, shared topics, and guide progression — not random related links.